Step 1: Gather the Necessary Tools and Materials
To connect a plastic water line to your refrigerator, you will need a few tools and materials. Make sure you have the following items on hand before you begin:
– Plastic water line kit: This can be purchased at most hardware or home improvement stores. Look for a kit that includes a plastic tubing, compression fittings, and a shut-off valve.
– Adjustable wrench: This will be used to tighten the compression fittings.
– Drill and drill bits: You may need to drill a hole in your kitchen cabinet or wall to run the water line through.
– Teflon tape: This will help create a watertight seal between the fittings.
Step 2: Shut Off the Water Supply
Before you start working on the water line, it’s important to shut off the water supply to your refrigerator. Locate the main water shut-off valve in your home and turn it off. This will prevent any water from flowing while you make the connection.
Step 3: Find the Water Source
Next, you’ll need to locate a suitable water source to connect the plastic water line to. This could be an existing water line under your sink or a nearby cold water pipe. Ensure that the water source is easily accessible and has enough space to install the shut-off valve.
Step 4: Install the Shut-Off Valve
Using your adjustable wrench, install the shut-off valve onto the water source. Make sure to wrap Teflon tape around the threads of the valve to create a tight seal. Tighten the valve securely, but be careful not to overtighten and damage the fittings.
Step 5: Measure and Cut the Plastic Tubing
Measure the distance from the shut-off valve to the back of your refrigerator. Add a few extra inches to allow for any bends or curves. Using a sharp utility knife or tubing cutter, carefully cut the plastic tubing to the desired length.
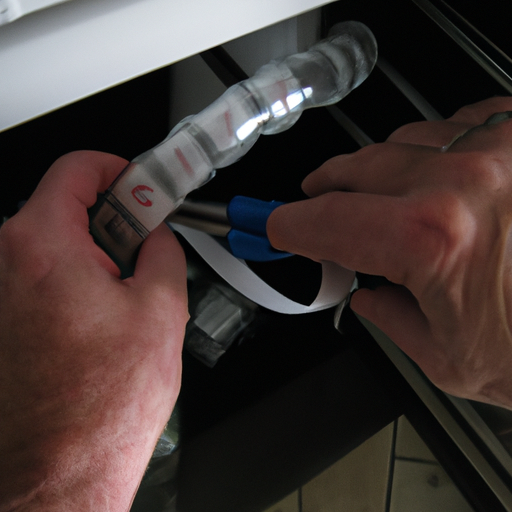
Step 6: Attach the Compression Fittings
Take one end of the plastic tubing and insert it into the compression fitting on the shut-off valve. Push it in as far as it will go, and then tighten the compression nut with your adjustable wrench. Repeat this process on the other end of the tubing, attaching it to the water inlet valve on the back of your refrigerator.
Step 7: Test for Leaks
Once all the connections are secure, turn on the water supply and check for any leaks. Inspect the shut-off valve, compression fittings, and tubing connections for any signs of water leakage. If you notice any leaks, tighten the fittings as needed until the leaks stop.
Step 8: Secure the Tubing
To prevent the plastic tubing from kinking or getting damaged, secure it to the back of your refrigerator or along the wall using plastic clips or adhesive hooks. This will help keep the tubing in place and prevent any accidental damage.
Step 9: Plug in the Refrigerator
Finally, plug in your refrigerator and ensure that it is properly connected to the power source. Once everything is set up, you can enjoy the convenience of having a water supply for your refrigerator’s ice maker and water dispenser.
Connecting a plastic water line to your refrigerator is a relatively simple process that can be done with a few basic tools and materials. By following these step-by-step instructions, you can have your water line connected in no time and enjoy the benefits of chilled water and ice at your convenience.